

Landscape lighting is the use of low-voltage outdoor fixtures, organized across specific zones in your yard, to improve safety, highlight architectural features, and create a welcoming atmosphere after dark. Low-voltage systems step standard household current down from 120 volts to 12 volts, making them safe for homeowners to work with and far more energy efficient than traditional line-voltage alternatives. The five core outdoor zones, including entry areas, patios, garden beds, pathways, and the perimeter, give every installation a clear structure. Whether you want subtle accent lighting on a garden bed or bright security coverage along your fence line, understanding how these systems work is the first step toward a yard that looks as good at 9:00 PM as it does at noon.
What is landscape lighting explained in practical terms?
Landscape lighting, known in the industry as low-voltage outdoor illumination, is defined by its use of a transformer to reduce household current. Low-voltage landscape lighting steps 120-volt household power down to 12 volts, which is safer for residential installation and allows for smaller, more discreet fixtures. That voltage reduction is not just a safety feature. It also cuts energy consumption significantly compared to standard line-voltage systems.
The transformer sits between your home’s electrical panel and your outdoor fixtures. It handles all the heavy lifting, so the wire runs through your yard carry only 12 volts. This means you can bury cables at a shallow depth, work on fixtures without an electrician present, and add new lights without rewiring your home.

Control options have expanded well beyond simple timers. Smart home automation hubs now let homeowners control lighting from a smartphone, set custom scenes for different occasions, and sync outdoor lights with the rest of the home. Photocells turn lights on at dusk and off at dawn automatically. These controls add real convenience without adding complexity to the installation itself.
Key advantages of low-voltage systems at a glance:
- Safe to handle: 12-volt current poses no shock risk during routine maintenance
- Energy efficient: LED fixtures on low-voltage systems use a fraction of the power of line-voltage alternatives
- Flexible fixture placement: Smaller, lighter fixtures fit into tight spots along borders and beds
- Expandable: Adding fixtures later requires only a wire connection at the transformer
- Smart-ready: Compatible with automation hubs for remote control and scene programming
Pro Tip: Size your transformer to handle at least 20% more wattage than your current fixture load. This protects the unit from running at full capacity and leaves room to add fixtures later without buying new equipment.
How do outdoor zones shape your lighting design?
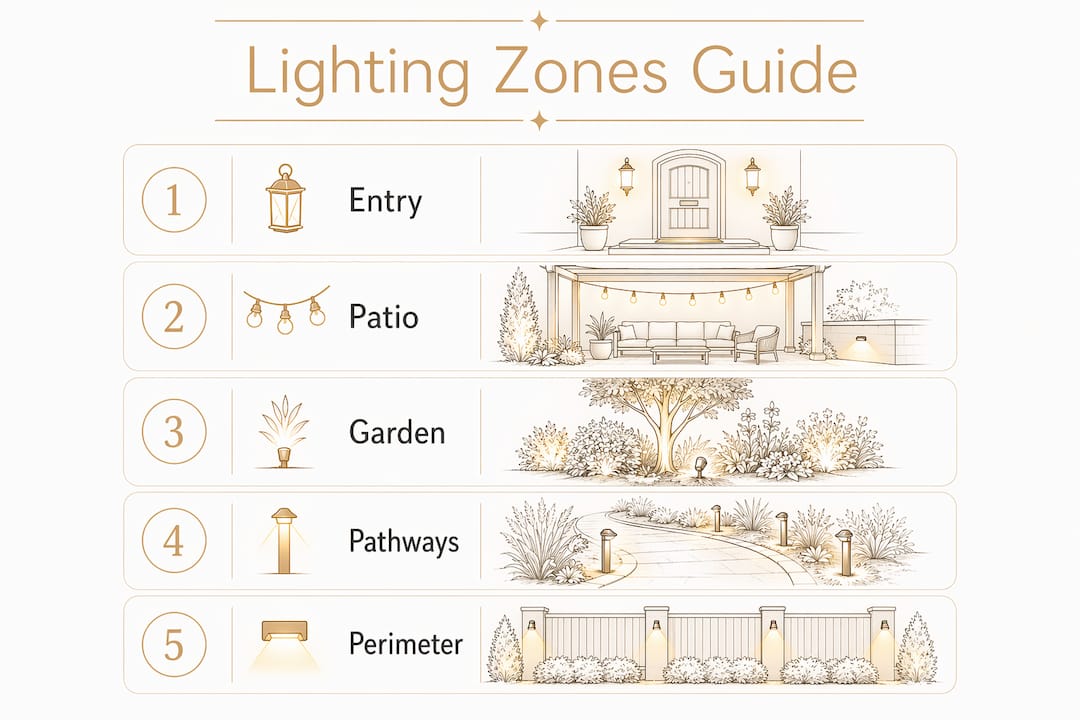
Five core outdoor zones define every well-planned residential lighting layout: Entry/Walkway, Patio/Living Area, Garden Beds/Features, Pathways/Side Yards, and Perimeter/Security. Organizing your property by zone prevents the common mistake of lighting randomly and ensures every fixture serves a clear purpose. Each zone has different brightness needs, fixture types, and color temperature requirements.
Here is how each zone functions and what it needs:
- Entry/Walkway: This is the first impression. Wall-mounted fixtures, post lights, or low path lights at 2,700–3,000K color temperature create a warm, welcoming arrival. Brightness here should be moderate, not blinding.
- Patio/Living Area: This zone needs layered light. Overhead string lights or downlights provide general illumination, while accent fixtures highlight planters or architectural details. Aim for a warm, relaxed tone around 2,700K.
- Garden Beds/Features: Uplights, spotlights, and well lights draw attention to trees, shrubs, and sculptures. This zone rewards restraint. Lighting every plant flattens the visual effect. Choose two or three focal points instead.
- Pathways/Side Yards: Path lights spaced 6–10 feet apart guide movement safely. Side yards often connect front and back, so consistent, low-glare fixtures keep the transition smooth.
- Perimeter/Security: Brighter fixtures, motion sensors, and flood lights belong here. This zone protects the property and deters unwanted activity. Perimeter lighting removes dark hiding spots along fences and property edges.
Lighting consultants consistently recommend building incrementally, starting with the zones homeowners use most and expanding over time. Starting with your entry and patio gives you immediate results and lets you learn what works before committing to a full installation. Budget management and design confidence both improve when you take this approach.
Color temperature consistency across zones matters more than most homeowners expect. Mixing warm 2,700K fixtures with cool 5,000K lights in adjacent zones creates a jarring, unfinished look. Stick to one color temperature range across the entire property for a cohesive result.
What fixture types and techniques produce the best results?
The most effective outdoor lighting designs combine multiple fixture types and techniques rather than relying on a single approach. Path lights, uplights, downlights, spotlights, step lights, and recessed well lights each serve a distinct purpose. Using only one type produces flat, one-dimensional results.
The table below matches common techniques to their best applications:
| Technique | Best use | Fixture type |
|---|---|---|
| Uplighting | Trees, columns, tall shrubs | Spike-mounted spotlight or well light |
| Grazing | Textured walls, stone surfaces | Low-angle spotlight placed close to surface |
| Shadowing | Plants near a wall | Uplight placed between plant and wall |
| Silhouette | Distinctive plant shapes | Uplight aimed at wall behind the subject |
| Moonlighting | Patios, lawn areas | Downlight mounted high in a tree |
| Path-edge accenting | Walkways, borders | Low-profile path light staked beside path |
Uplighting is the most widely used technique because it works on almost any vertical subject. Grazing is underused but produces dramatic results on stone walls and brick facades. Moonlighting, where a fixture is mounted high in a tree to cast soft downward light, creates the most natural-looking outdoor ambiance of any technique.
Lighting success depends on the interplay between illuminated areas and intentional dark spaces. Leaving gaps between lit features adds depth and makes the lit areas feel more dramatic. A yard where every surface is lit equally looks flat and commercial, not inviting.
Pro Tip: Avoid placing path lights less than 6 feet apart. Fixtures spaced too closely create a runway effect that reads as commercial rather than residential. Stagger them on alternating sides of the path for a natural, rhythmic flow.
How should homeowners plan fixture spacing and wiring?
Fixture spacing and wiring layout determine whether your system performs consistently or develops frustrating dimming problems over time. Path lights spaced 6–10 feet apart and staggered on alternating sides of a walkway produce the most natural visual rhythm. Straight rows of evenly spaced fixtures look institutional, not residential.
Wiring layout is where many DIY installations fall short. The two most common approaches are the daisy-chain run and the hub-and-branch layout:
| Wiring method | How it works | Best for | Main drawback |
|---|---|---|---|
| Daisy chain | Fixtures connect in a single line from transformer | Small systems, 4–6 fixtures | Voltage drop causes dimming at far end |
| Hub and branch | Central hub branches shorter runs to each fixture | Larger systems, 7+ fixtures | Requires more wire and a hub connector |
Hub wiring layouts prevent voltage drop by keeping each cable run short. Voltage drop occurs when fixtures far from the transformer receive less power and appear dimmer than fixtures close to it. A hub-and-branch system solves this by ensuring no single run stretches too far. Keep individual runs under 100 feet and use heavier gauge wire on longer runs for consistent brightness.
Transformer sizing follows a straightforward rule. Choose a unit rated for at least 20% more wattage than your total connected fixture load. Running a transformer at full capacity shortens its lifespan and leaves no room to add fixtures later. A 150-watt transformer works well for a system drawing 120 watts total.
Maintenance keeps the system performing long term. Check wire connections at the start of each season. Replace any fixture that has shifted out of position after heavy rain or landscaping work. Clean lens covers on uplights and spotlights twice a year to maintain full output. A well-maintained low-voltage system lasts well over a decade with minimal cost.
Key Takeaways
Effective landscape lighting requires low-voltage systems organized by zone, with deliberate fixture spacing, hub wiring, and intentional dark spaces to create depth and consistent performance.
| Point | Details |
|---|---|
| Low-voltage systems are the standard | Transformers step 120V down to 12V for safety, efficiency, and flexible fixture placement. |
| Zone-based planning prevents waste | Organize your property into five zones and light high-use areas first before expanding. |
| Spacing and staggering matter | Path lights spaced 6–10 feet apart and staggered look natural; closer spacing looks commercial. |
| Hub wiring prevents dimming | Branch wiring from a central hub keeps runs short and maintains consistent brightness. |
| Dark spaces are part of the design | Intentional gaps between lit areas add depth and make illuminated features stand out. |
Why I think most homeowners light too much, too fast
The most common mistake I see is homeowners trying to light everything at once. They buy a full kit, stake fixtures every few feet along every path, uplight every shrub, and flood the perimeter with bright white light. The result looks like a parking lot, not a home.
The professional landscape lighting design approach I respect most starts with two or three focal points and builds outward. Pick the front entry, one specimen tree, and the patio. Get those right first. The dark areas around them will actually make those lit features look better, not worse.
Smart controls changed how I think about this entirely. When you can dim zones from your phone or set a “movie night” scene that drops the patio lights to 30%, you stop thinking about lighting as a fixed installation. You start thinking about it as something you adjust to fit the moment. That shift in mindset produces far better results than any single fixture choice.
My honest advice: resist the urge to fill every dark corner. Outdoor lighting design rewards restraint. The homes that look best at night are the ones where someone made deliberate choices about what not to light.
— Dave
Foreverglowlighting’s approach to custom outdoor illumination
Foreverglowlighting designs and installs custom landscape lighting for homeowners across Charlotte who want results that look intentional, not improvised. Every installation starts with a zone-by-zone assessment covering entry areas, patios, garden features, pathways, and perimeter security.
The team at Foreverglowlighting uses smart LED systems that integrate with smartphone controls, so you can adjust scenes, set schedules, and manage security lighting without touching a single fixture. From architectural accent lighting to full perimeter coverage, every system is sized and wired for consistent performance from day one. Contact Foreverglowlighting today for a free estimate and see what a professionally designed outdoor lighting plan looks like for your property.
FAQ
What is low-voltage landscape lighting?
Low-voltage landscape lighting uses a transformer to reduce household current from 120 volts to 12 volts. This makes the system safer to install, more energy efficient, and compatible with smaller, discreet fixtures.
How far apart should path lights be spaced?
Path lights should be spaced 6–10 feet apart and staggered on alternating sides of the walkway. Spacing closer than 6 feet creates a cluttered, commercial appearance rather than a cozy residential feel.
What are the five outdoor lighting zones?
The five core zones are Entry/Walkway, Patio/Living Area, Garden Beds/Features, Pathways/Side Yards, and Perimeter/Security. Organizing your property by zone ensures every fixture serves a clear functional or aesthetic purpose.
What causes landscape lights to dim over distance?
Voltage drop causes fixtures far from the transformer to appear dimmer than those nearby. A hub-and-branch wiring layout, with shorter cable runs branching from a central hub, prevents this problem and maintains consistent brightness.
Do I need to light my entire yard at once?
No. The most effective systems are built incrementally, starting with high-use zones like the entry and patio. Expanding gradually lets homeowners refine their design and manage costs without sacrificing results.