
Permanent outdoor lighting, known in the industry as architectural LED track lighting, costs Charlotte homeowners between $2,500 and $12,000 for a professionally installed system. This permanent lighting installation cost guide breaks down exactly where that money goes, what drives prices up or down, and how to evaluate quotes with confidence. The industry standard rate runs $16–$40 per linear foot installed, with most mid-tier systems landing around $25–$30 per foot. Understanding these numbers before you call a single installer puts you in a far stronger position.
What factors determine permanent lighting installation cost?
The total price of a permanent lighting system depends on several measurable variables. Knowing each one helps you read a quote accurately and spot where corners are being cut.
- Linear footage of roofline. The length of fascia where the track mounts is the primary pricing unit. A standard single-story home with 150–200 linear feet typically costs $2,500–$6,000. A two-story home with complex architecture can reach $12,000 or more.
- Number of stories and roof height. Taller homes require more labor time, specialized ladders, and additional safety measures. That extra effort shows up directly in the labor line of your quote.
- Material quality. Track channels, LED nodes, and weatherproof connectors vary widely in grade. Quotes below $20 per foot almost always indicate lower-grade components that will fail sooner or look uneven from the street.
- Controller features. Basic zone controllers cost less upfront but limit what you can do with the system. Advanced app-controlled systems with RGBWW color mixing and multi-year warranties deliver better long-term value and daily usability.
- Electrical access. Professional systems require dedicated, weather-protected GFCI-rated outlets. If your home lacks them, electrical upgrades can add $500–$1,500 to the total project cost.
Pro Tip: Ask every installer to separate materials, labor, electrical work, and the controller in their quote. A single lump-sum number makes it impossible to compare bids fairly.
Labor alone accounts for 20–30% of total job costs, reflecting the detailed work of precise spacing, weatherproof terminations, and system programming. That percentage rises with architectural complexity, so a home with dormers, gables, or multiple rooflines will sit at the higher end.

How to accurately measure your roofline for a fair quote
Measurement accuracy directly controls how much you pay. Homeowners who measure incorrectly often receive quotes that are either inflated or based on the wrong scope entirely.
- Identify the fascia line only. Installers measure the roof fascia edges where the lighting channel physically mounts. Roofline linear footage is not the same as your home’s total perimeter. Counting the full exterior boundary of your property adds unnecessary footage and cost.
- Walk each roofline section separately. Measure the front roofline, each side, and any garage or porch fascia you want lit. Write each section down individually before adding them together.
- Avoid multiplying for pitch. Some homeowners assume a steep roof pitch means more linear feet of track. It does not. The track mounts along the horizontal fascia edge, not up the slope.
- Request an itemized measurement from your installer. A professional should provide a written breakdown showing each roofline section measured. This protects you from being charged for footage that was never installed.
- Use satellite imagery as a cross-check. Tools like Google Maps satellite view let you estimate roofline lengths before your consultation. This gives you a reasonable baseline to compare against the installer’s measurement.
Pro Tip: If two quotes differ by more than 20 linear feet on the same home, ask both installers to walk you through their measurement. Discrepancies that large usually signal a mistake or an intentional upsell.
Measurement precision matters because materials are priced per foot. Even a 15-foot overestimate at $28 per foot adds $420 to your bill for track you never receive.
What does the installation process look like, step by step?
Understanding the installation sequence helps you verify that your installer is following professional standards and not skipping steps that protect your investment.
- Initial assessment and consultation. The installer evaluates your roofline, electrical panel, and outlet locations. This step determines whether electrical upgrades are needed before any materials are ordered.
- Product selection. You choose the track channel style, LED node type, and controller. Foreverglowlighting offers color-changing LED systems controllable from a smartphone, which means you can switch from holiday colors to security white lighting without touching a ladder.
- Electrical preparation. New GFCI outlets or dedicated circuits are installed if required. Skipping this step is a code violation in most jurisdictions and a common shortcut in underpriced bids.
- Track mounting and wiring. The lighting channel is cut to fit, mounted flush to the fascia, and wired with weatherproof terminations. This is where fit and finish quality becomes visible. Custom cutting and soldered connections protect against moisture intrusion.
- Controller programming and system testing. The app or controller is configured, scenes are programmed, and every node is tested. A professional installer confirms full coverage before leaving the site.
- Cleanup and warranty review. The crew removes all debris, and the installer walks you through the warranty terms. Confirm that individual LED nodes are field-serviceable, meaning a single failed bulb can be replaced without dismantling the entire track.
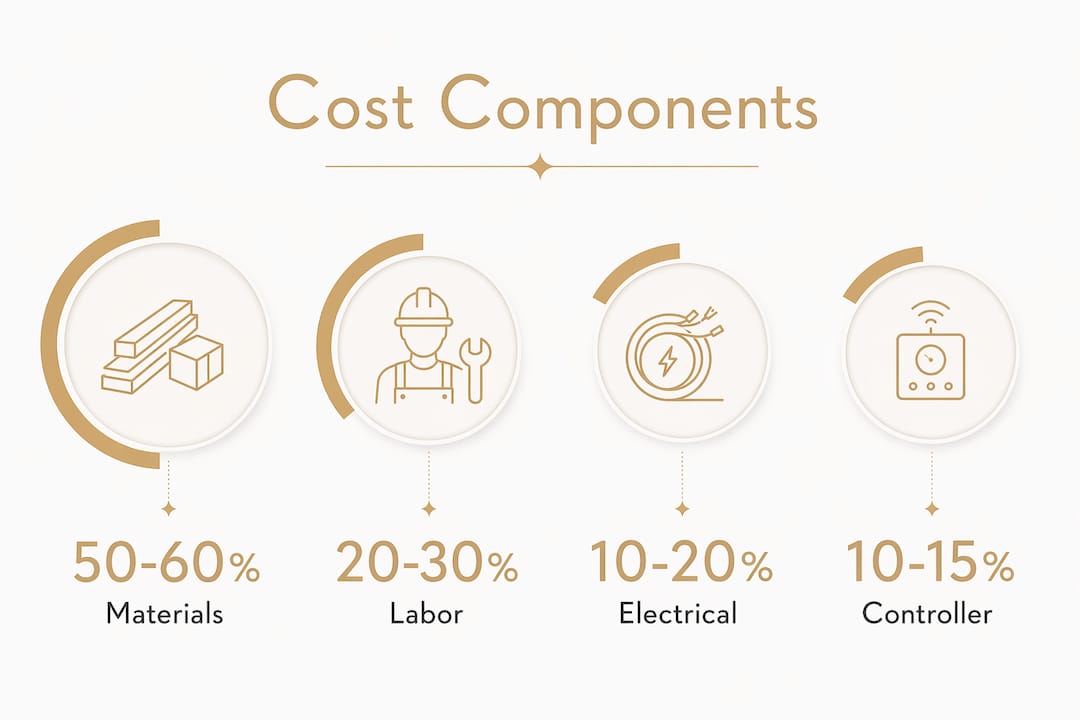
Typical price components by installation stage
| Installation stage | Typical cost contribution |
|---|---|
| Materials (track, LEDs, connectors) | 50–60% of total project cost |
| Labor (mounting, wiring, programming) | 20–30% of total project cost |
| Controller and app hardware | 10–15% of total project cost |
| Electrical upgrades (if needed) | $500–$1,500 added separately |
These proportions hold for most residential installations. Electrical upgrades are the most common source of budget surprises because many low-bid installers exclude them from the initial quote entirely.
What hidden costs should Charlotte homeowners watch for?
Low quotes attract attention, but they often signal problems that cost more to fix later than the initial savings were worth.
- Underpriced materials. Very low quotes often skip professional-grade components such as adequate sealing and proper wiring, which compromise system durability within the first year or two.
- Excluded electrical work. Permit fees and new circuit installation are frequently left out of entry-level bids. Always ask whether electrical upgrades and permits are included before signing.
- Limited controller capability. A basic controller that only switches between a few preset zones will frustrate you within one season. Confirm that the system supports full color control and scheduling before committing.
- No warranty or a very short one. A system without a multi-year warranty on both parts and labor is a liability. Quality installers stand behind their work for at least two to three years.
- Future repair costs. Systems with proprietary components that are not field-serviceable can require full track replacement for a single failed node. That turns a minor repair into a major expense.
“Homeowners should evaluate warranty scope and system capabilities rather than only comparing price to ensure lasting value and satisfaction with permanent lighting. Lower quotes might appear attractive but often skip essential steps such as adequate sealing and professional wiring, which compromise system durability.”
The professional landscape lighting design approach prioritizes fit and finish from the start. That upfront investment in quality workmanship prevents the repair costs that make cheap systems expensive over time.
Is permanent lighting more cost-effective than seasonal holiday lighting?
For Charlotte homeowners who hire a service to hang and remove holiday lights each year, the math on permanent lighting is straightforward.
Seasonal professional installation averages $1,500–$3,000 per year. A permanent system at $5,000 installed breaks even in roughly two to three seasons at the low end of seasonal pricing, and within three to five seasons at the high end. After that point, the permanent system costs you almost nothing annually beyond electricity.
Pro Tip: Calculate your personal break-even by dividing your permanent system quote by your annual seasonal lighting bill. If the number is under five, permanent lighting is the financially stronger choice.
Energy costs favor permanent LED systems significantly. Permanent LED systems produce 80–90% energy savings compared to incandescent holiday lights. Typical yearly electricity cost for permanent LEDs runs $30–$60, versus $200–$400 for incandescent strands. That difference compounds every year the system runs.
The year-round versatility of permanent lighting adds value beyond the holiday season. Foreverglowlighting systems support millions of color combinations, so the same roofline that displays red and green in december can shift to white security lighting in february or team colors for a game-day gathering. Permanent lighting also improves home security by maintaining consistent exterior visibility throughout the year, which seasonal lighting cannot provide.
| Cost category | Seasonal lighting (per year) | Permanent lighting (amortized) |
|---|---|---|
| Installation or amortized system cost | $1,500–$3,000 | $1,000–$2,000 (over 5 years) |
| Annual electricity cost | $200–$400 | $30–$60 |
| Maintenance and repairs | Variable | Minimal with field-serviceable LEDs |
| Year-round availability | No | Yes |
What a Charlotte lighting expert actually sees on the job
Working with homeowners across Charlotte, the pattern I see most often is this: the homeowner who chose the lowest bid calls back within 18 months because something has failed, and the original installer is either unreachable or charges full price for a repair that a quality warranty would have covered at no cost.
The controller is where I see the biggest misconceptions. Homeowners assume all app-controlled systems are equivalent. They are not. A system with true RGBWW mixing and individual node addressing gives you creative control that a basic zone controller simply cannot match. That difference matters every single time you use the system, not just at installation.
Charlotte’s electrical codes require GFCI protection for all outdoor outlets. Installers who skip this step are not just cutting costs. They are creating a code violation that can complicate your homeowner’s insurance and your home sale down the road. Always ask to see the permit before the crew leaves.
My honest advice: budget 10–15% above the installer’s quote for electrical contingencies. In older Charlotte neighborhoods, the gap between what a home has and what a professional system needs is almost always larger than the initial assessment suggests. Planning for that gap upfront prevents the frustration of a mid-project surprise.
— Dave
Foreverglowlighting’s approach to permanent lighting in Charlotte
Charlotte homeowners who want a clear, itemized cost estimate and a system that performs year after year have a local option built specifically for that expectation.
Foreverglowlighting installs weatherproof LED track systems designed to mount flush with your roofline and disappear during daylight hours. Every installation includes professional electrical assessment, GFCI-compliant outlet setup, and full app-based color control. The team covers residential holiday lighting as well as landscape and security lighting for complete exterior coverage. Contact Foreverglowlighting for a free estimate and a written measurement breakdown before any work begins.
FAQ
How much does permanent outdoor lighting cost for a typical home?
Most single-story homes in Charlotte cost $2,500–$6,000 installed, while two-story or architecturally complex homes range from $6,000–$12,000. Pricing runs $16–$40 per linear foot depending on materials and controller quality.
What is the difference between roofline footage and total perimeter?
Roofline footage measures only the fascia edges where the lighting track mounts. Total perimeter includes all exterior walls, which is a larger number and not the correct measurement for a lighting quote.
Are electrical upgrades always required for permanent lighting?
Not always, but GFCI-rated outdoor outlets are required by code. If your home lacks them, electrical upgrades typically add $500–$1,500 to the project cost.
How long before permanent lighting pays for itself?
Compared to seasonal professional installation at $1,500–$3,000 per year, most permanent systems reach their break-even point within three to five seasons.
Can individual LED nodes be replaced without removing the whole track?
Quality professional systems use field-serviceable LED nodes, meaning a single failed bulb can be swapped out without dismantling the track. Confirm this feature before signing any installation contract.
Key takeaways
Permanent outdoor lighting costs $16–$40 per linear foot installed, with most Charlotte homes landing between $2,500 and $12,000 depending on size, materials, controller quality, and electrical requirements.
| Point | Details |
|---|---|
| Cost is measured per linear foot | Industry standard pricing runs $16–$40 per foot; mid-tier systems average $25–$30 per foot installed. |
| Electrical upgrades are a common extra | GFCI outlets and dedicated circuits add $500–$1,500 when existing wiring cannot support the system. |
| Measure roofline fascia, not perimeter | Accurate measurement of fascia edges prevents overpaying for materials that are never installed. |
| Low quotes often hide quality gaps | Bids below $20 per foot typically use lower-grade components or skip weatherproof sealing and proper wiring. |
| Permanent systems break even in 3–5 years | Compared to annual seasonal installation costs, permanent lighting pays for itself within a few seasons and saves on energy costs every year after. |