
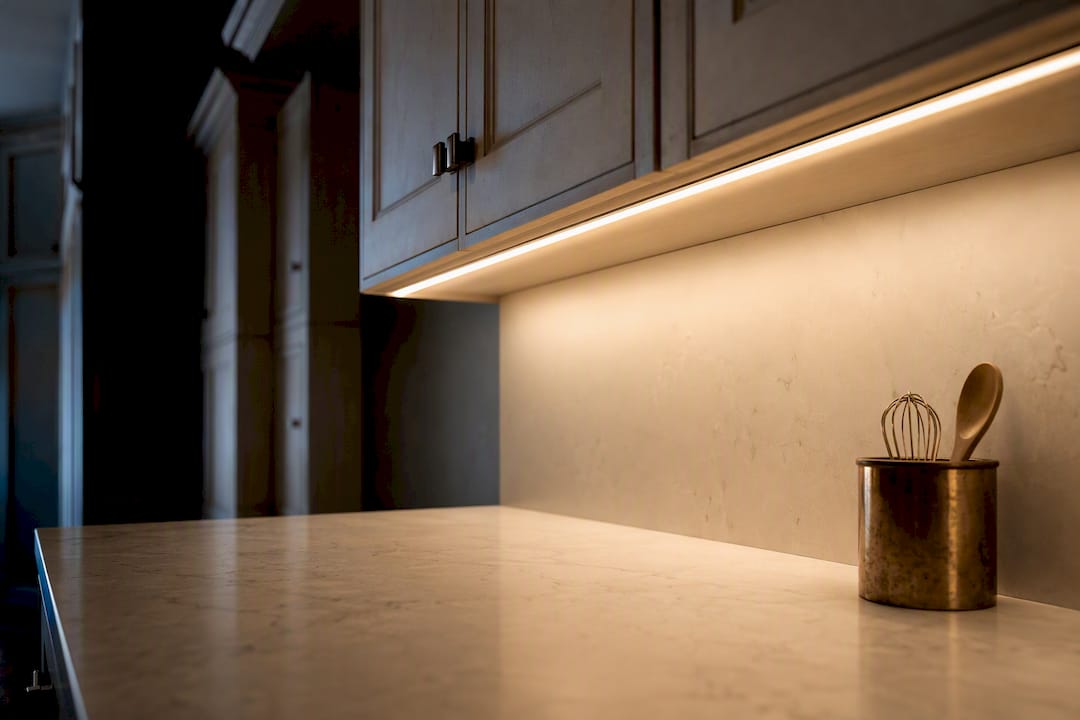
For most kitchens, LED strips or LED light bars deliver the best combination of even task light, low heat, and long life, especially when run inside an aluminum channel. Puck lights work better for accent and display shelving where you want pools of light instead of a wash. Renters or anyone without easy outlet access should look at battery or plug-in kits since they need no wiring changes.
TL;DR:
- LED strip lights with aluminum channels and frosted diffusers offer a seamless, professional look and are best for general task lighting in kitchens.
- COB LED tape creates a dot-less glow ideal for reflective surfaces, while puck lights provide accent pools of light suitable for display or highlighting features.
- LED fixtures outperform halogen, xenon, and fluorescent options in efficiency, lifespan, and color rendering, making them the best choice for new kitchen installations in 2026.
- Hardwired systems deliver a cleaner appearance but require professional installation, whereas plug-in and rechargeable options are easier for DIY projects or rentals.
- Proper installation practices, including cleaning surfaces and avoiding heat buildup, significantly extend the lifespan of under-cabinet lighting.
Table of Contents
- Under Cabinet Lighting Types: Strips, Pucks, and Bars Compared
- LED, Fluorescent, Halogen, or Xenon: Which Bulb Technology Wins?
- Hardwired, Low-Voltage, Plug-In, or Battery: Matching Power to Your Project
- Choosing the Right Specs: Brightness, Color, and Placement
- Installation Mistakes That Shorten the Life of Your Lighting
- What Under Cabinet Lighting Actually Costs Over Time
- A Real Kitchen: Under-Cabinet Lighting Choices in Gastonia
- A Practical Take on DIY vs. Professional Installs
- How Forever Glow Lighting Handles Under-Cabinet Installs
- Sources
Under Cabinet Lighting Types: Strips, Pucks, and Bars Compared
Choosing between the main under cabinet lighting types comes down to what kind of light you actually want on your countertop. Each fixture style produces a different lighting effect, and that difference matters more than most homeowners expect before they start shopping.
LED strip lighting (also called tape light) is adhesive-backed, cut-to-length, and flexible enough to follow curved cabinet edges. Raw tape mounted directly to a cabinet bottom often shows visible dots between diodes, especially on glossy quartz or stone countertops. That’s why LED light bars and strip lights in an aluminum channel with a frosted diffuser lens are the standard recommendation for a professional look. The channel also protects the tape and gives you a mounting surface that doesn’t rely on adhesive alone.
Within tape light, there’s an important distinction between COB and SMD. SMD (surface-mounted diode) tape has individual light points spaced along the strip, which is where the dotting problem comes from. COB (chip-on-board) tape packs the diodes so tightly that the light reads as one continuous line instead of a string of dots. COB tape light produces a dot-less, seamless glow that’s become the preferred choice for reflective surfaces, and it has quickly become a favorite for architectural washes on stone or quartz.
Puck lights are round fixtures, usually 2 to 3 inches across, that throw a circular pool of light rather than a continuous band. They mount to the cabinet bottom with screws or adhesive, and some models recess into the cabinet for a flush look. Puck lights need careful spacing (typically every 8 to 12 inches) to avoid dark gaps between pools, which makes them a poor choice for food prep areas but a strong one for glass-front cabinets, open shelving, or highlighting a backsplash.
Light bars are rigid fixtures, usually aluminum housings with LEDs inside, that sit somewhere between strips and pucks in terms of flexibility. You can’t bend them around curves, but they deliver a more even, shadow-free flood than pucks and a sturdier, more finished profile than bare tape. Many bars link together end to end, which makes them practical for long runs across multiple cabinets on one switch.
Quick comparison of the three:
- Strip/tape light: continuous wash, best in a channel, most flexible for odd cabinet shapes
- Puck lights: scalloped pools of light, best for accents and display, needs tight spacing for task use
- Rigid light bars: even flood, most durable and finished appearance, easiest to link across long runs
LED, Fluorescent, Halogen, or Xenon: Which Bulb Technology Wins?
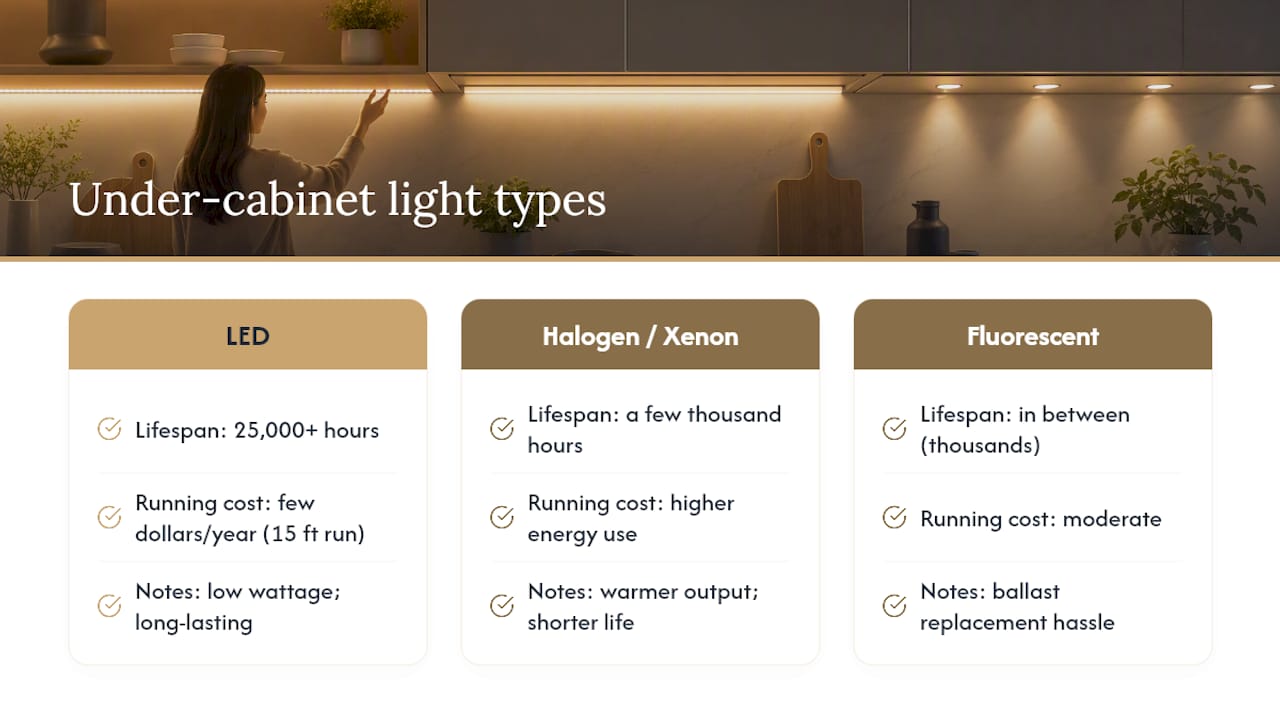
LED wins this comparison by a wide margin, and for kitchens built or renovated in 2026, it’s essentially the only technology worth installing new. LED fixtures use as little as 5 watts for adequate under-cabinet brightness and beat both xenon and halogen on energy efficiency and lifespan.
Here’s how the four technologies stack up on the traits that actually matter under a cabinet:
- LED: lowest heat output, longest lifespan (often 25,000 to 50,000 hours), most efficient, widest range of color temperatures and CRI options
- Halogen: warm and flattering light, but runs hot and burns out faster, often within a few thousand hours
- Xenon: similar to halogen with slightly better efficiency and a whiter light, still runs noticeably hotter than LED
- Fluorescent: once common in builder-grade kitchens, now largely phased out due to flicker, mercury content, and bulkier fixtures
LED under-cabinet fixtures typically draw a fraction of the wattage of halogen or xenon equivalents while lasting many times longer. That efficiency gap is the main reason design guides and electricians have stopped recommending legacy bulbs for new installs.
Color rendering index (CRI) is where LED made its biggest leap. Early LED products had a reputation for washing out colors, but current high-CRI LED tape and bars now match or beat halogen’s color accuracy while running cooler. Halogen and xenon still show up occasionally in older kitchens or budget retrofit kits, but there’s little reason to specify either one in a new installation.
Hardwired, Low-Voltage, Plug-In, or Battery: Matching Power to Your Project
Your power source decision usually comes down to whether you’re doing a full renovation with open walls or a weekend retrofit on a finished kitchen. Each option carries a different cost, skill requirement, and finished appearance.
- Hardwired systems connect directly to your home’s electrical wiring and typically tie into a wall switch, giving you the cleanest look with no visible cords. Hardwired installs generally cost $150 to $500 with labor compared to $30 to $120 for plug-in kits, and most jurisdictions require a licensed electrician for any new circuit or switch wiring.
- Low-voltage drivers step down household 120V power to 12V or 24V, which is what most LED strips and bars actually run on. The driver (sometimes called a transformer) needs to sit somewhere accessible for future replacement, ideally in a nearby cabinet with airflow rather than sealed behind drywall.
- Plug-in kits run on standard household voltage through a cord that plugs into a nearby outlet, making them the easiest retrofit option for kitchens that already have outlets positioned above the backsplash. Route the cord along the cabinet’s back edge and use adhesive clips to keep it out of sight.
- Battery and rechargeable units need no wiring or outlet at all. Rechargeable USB-C models have largely replaced single-use battery packs, solving the old complaint of constantly swapping batteries, and they’re the practical choice for renters or cabinet runs far from any outlet.
Pro Tip: If you’re planning a full remodel with open walls, ask your electrician about integrating the driver into a switched circuit rather than plugging it into an outlet. Central dimmer control feels far more finished than a wall-wart transformer hanging under your sink cabinet.
Choosing the Right Specs: Brightness, Color, and Placement
Getting the fixture style right matters less if the specs are wrong. A gorgeous COB channel light in the wrong color temperature or with gaps in coverage will still leave your countertop unevenly lit.
Start with lumen output. Aim for roughly 150 to 200 lumens per linear foot for genuine task lighting, not just ambient glow. That means a typical multi-bar kit producing 1,500 to 2,000 lumens total will usually cover a standard 10 to 12 foot run of cabinets. Go dimmer if you want a softer accent effect, but don’t undershoot task areas where you’re actually chopping vegetables or reading recipes.
Color temperature is measured in Kelvin, and it shapes the mood as much as the function. A range of 2700K to 3000K reads warm and cozy, closer to incandescent light, while 3000K to 4000K reads crisper and works better for detailed prep work. Tunable white fixtures that shift between warm and cool let you adjust the mood by time of day, which is worth the extra cost if you cook at night and entertain during the day.
CRI (color rendering index) deserves more attention than most buyers give it. A CRI of 90 or higher is recommended for kitchens because it renders food colors, wood tones, and countertop finishes accurately. Cheaper fixtures often sit in the 80 CRI range, which can make produce look duller and off-white cabinets look slightly yellow or blue.
A few placement rules prevent the most common mistakes:
- Mount fixtures toward the front edge of the cabinet, not the back, to throw light onto the counter instead of the backsplash
- Space puck lights every 8 to 12 inches; use continuous strips or bars where you need even task coverage
- Check dimmer compatibility before buying. Not every LED driver works with every wall dimmer, and mismatches cause flickering
- If smartphone or voice control matters to you, confirm the kit supports an app or a smart control system before installation, not after
Installation Mistakes That Shorten the Life of Your Lighting
The single most common failure homeowners report with tape light is adhesive letting go after a few months, usually from heat buildup or an unprepared surface. Mechanical fasteners or aluminum channels prevent this long-term detachment far more reliably than adhesive backing alone, especially on longer runs.
A few practices separate an installation that lasts from one that needs redoing within a year:
- Clean the cabinet bottom with rubbing alcohol before applying adhesive tape, since dust and grease are the top reasons adhesive fails early
- Use screw-in channels for any run longer than 3 feet rather than relying on the tape’s adhesive backing
- Give drivers and transformers room to breathe. A driver sealed inside a tight cabinet cavity with no airflow can overheat and fail prematurely
- Keep any wiring or driver components away from sink splash zones, and confirm outlets near water sources are on a GFCI circuit
Pro Tip: If your under-cabinet project involves a new switch, a new circuit, or work near a wet area like the sink, that’s the point where it’s worth calling a licensed electrician instead of pushing through a DIY plug-in workaround. Code requirements around GFCI and AFCI protection near kitchen countertops exist for good reason.
What Under Cabinet Lighting Actually Costs Over Time
Budgeting for under-cabinet lighting means thinking past the sticker price to the years of ownership ahead.
LED fixtures typically outlast halogen and xenon by a wide margin, often running 25,000 hours or more before dimming, compared to a few thousand hours for halogen. Fluorescent tubes fall somewhere in between but come with the added hassle of ballast replacement. Because LED draws so little wattage, even a fully lit 15 foot kitchen run typically costs just a few dollars a year to operate, a gap that becomes obvious the first time you compare an old halogen puck light setup’s warmth output to an LED equivalent.
On upfront cost, expect plug-in kits in the $30 to $120 range, hardwired bar or strip installations between $150 and $500 including labor, and rechargeable battery units priced similarly to plug-in kits but without any installation labor at all. Warranties vary by manufacturer, and it’s worth checking whether the driver is replaceable separately from the light fixture itself. A driver that fails after five years shouldn’t force you to tear out the whole system.
A Real Kitchen: Under-Cabinet Lighting Choices in Gastonia
On a recent kitchen under-cabinet and toe-kick lighting project in Gastonia, the homeowners chose hardwired LED strip lighting run inside aluminum channels for the counters, paired with a separate toe-kick run for a soft nighttime glow. Routing the driver into a ventilated end cabinet, instead of tucking it against the back wall, made future maintenance far simpler. They settled on a 3000K color temperature after testing samples against their quartz countertop, since anything warmer made the white stone look slightly yellow. The full under-cabinet lighting page has more examples for anyone weighing similar choices before requesting an estimate.
A Practical Take on DIY vs. Professional Installs
For most kitchens, LED strips or bars in a channel are the right call for task lighting, with puck lights reserved for accents on open shelving or glass cabinets. Before you buy anything, answer four questions: Do you have outlet access nearby? How long is the total run? What finish and color temperature fits your countertop? And do you actually want smartphone control, or is that a feature you’ll never open the app for? Answering those honestly saves you from returning a kit that looked great online but doesn’t fit your kitchen. Browsing recent projects before you shop gives you a realistic sense of what finished installs actually look like.
— Dave
How Forever Glow Lighting Handles Under-Cabinet Installs
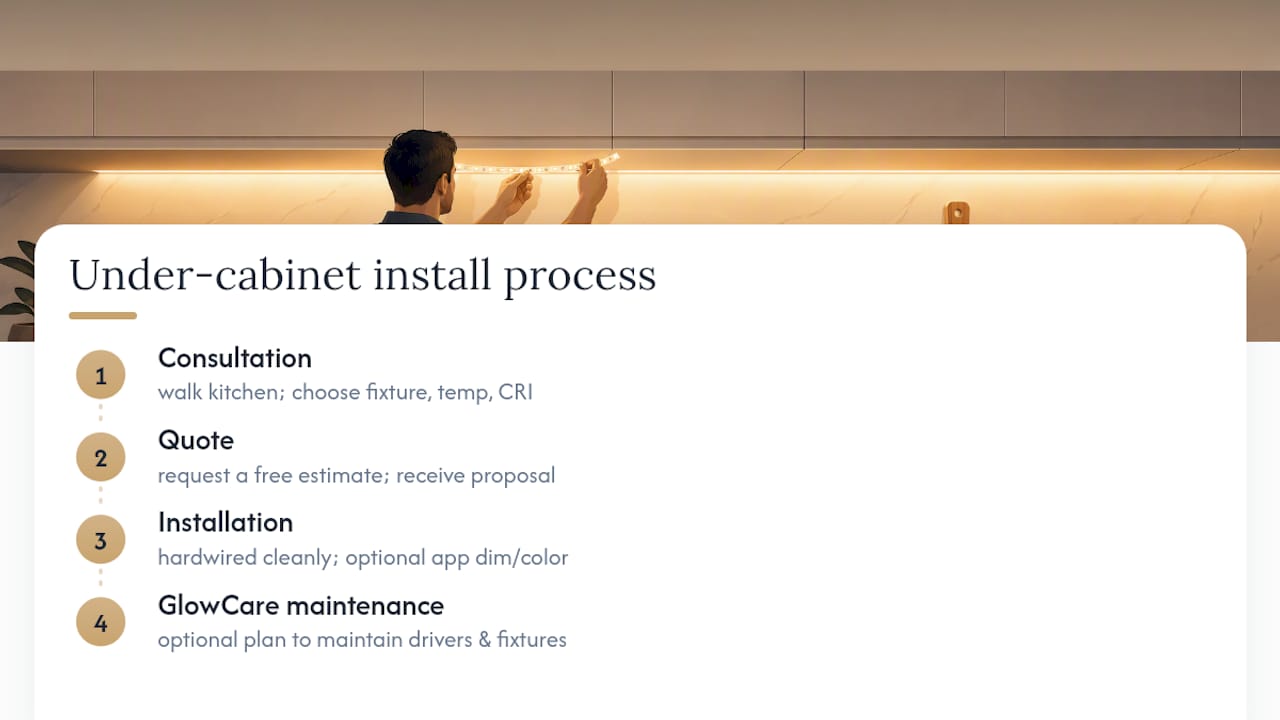
If wiring a driver into a switched circuit or fishing cable through cabinet backs isn’t how you want to spend a Saturday, Forever Glow Lighting handles the full process from design through installation. We select fixture type, color temperature, and CRI based on your countertop and cabinet finish, then handle the hardwired connection cleanly, with optional smartphone app control for dimming and color adjustments. The process runs consultation, then quote, then installation, then an optional GlowCare maintenance plan to keep drivers and fixtures performing for years.
If you’re weighing a broader kitchen refresh alongside your lighting, the pantry door selection guide from One Day Doors & Closets is a solid companion resource. When you’re ready to move forward on the lighting side, request a free estimate and we’ll walk your kitchen with you before recommending a fixture plan.
Sources
- Under Cabinet Lighting: Types, Installation & Best Options for 2026 – D and G Flooring
- 10 Best Under Cabinet Lighting Kits (August 2026) Top Reviews
- Under Cabinet Lighting Battery Vs Plug In: Which Is Actually Right for Your Kitchen?