
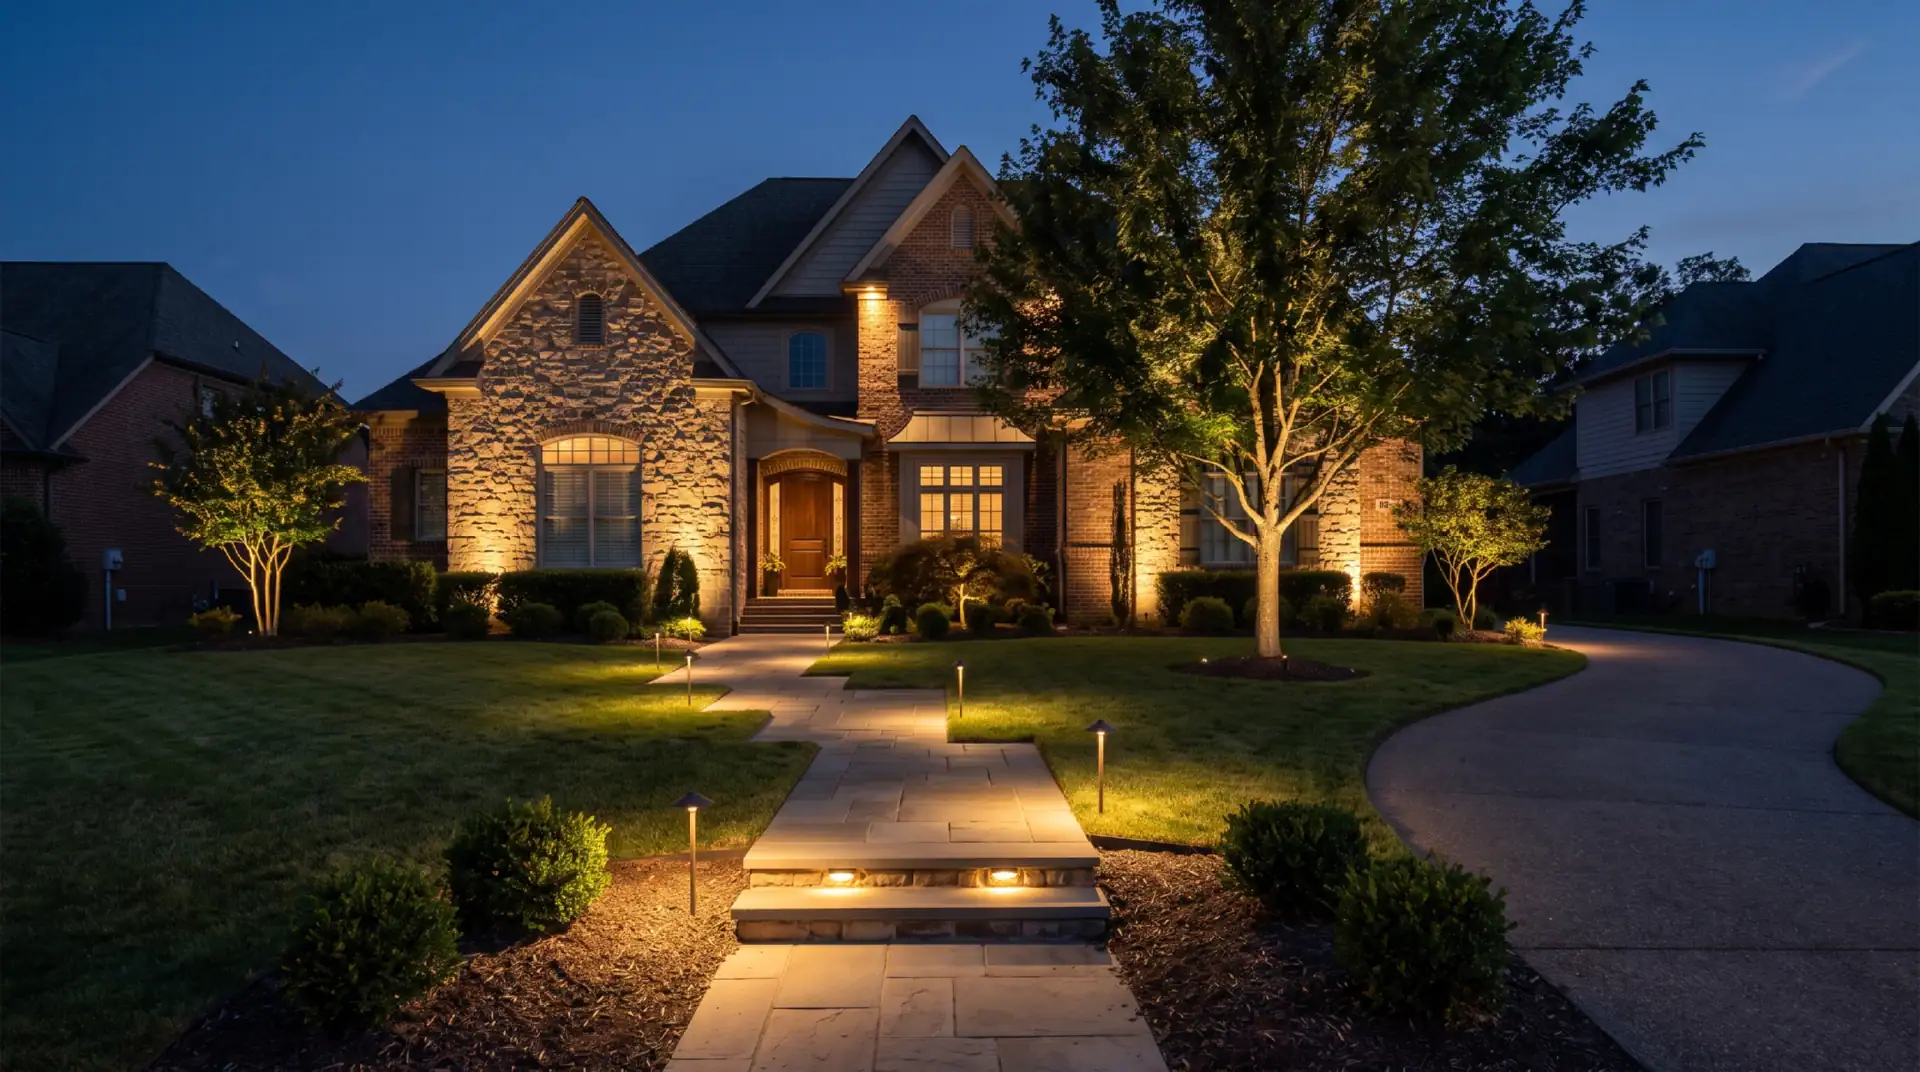
What is the rule of thumb for outdoor lighting?
- Hide the Source, Reveal the Effect: Conceal physical light fixtures behind shrubbery, architectural returns, or deep glare shields so the viewer’s eye sees the illuminated stonework and foliage, never the bare LED diode.
- Standardize on Warm Color Temperatures (2700K – 3000K): Use warm white spectrums across the property to flatter organic materials like brick, cedar, and botanical greens while avoiding the harsh, sterile blue glare of 4000K+ security floodlights.
- Space Path Lights Every 10 to 15 Feet (Staggered): Avoid the “airport runway” look by alternating path fixtures on opposite sides of a walkway, allowing soft pools of light to interleave with subtle pockets of shadow.
- Prioritize Lumen Hierarchy Over Raw Brightness: Layer light output intentionally—using 50 to 100 lumens for steps and paths, 150 to 300 lumens for small trees and architectural columns, and 400 to 700+ lumens for multi-story facades or mature oak canopies.
- Match Beam Spreads to the Target Geometry: Select narrow spot beams (10°–15°) for tall, slender columns or high peaks, medium floods (30°–36°) for standard trees, and wide washes (60°+) for broad stone retaining walls or dense hedges.
- Maintain Cohesive Sightlines from Indoors: Design the exterior lighting layout from the perspective of interior living room and kitchen windows to eliminate the “black mirror” effect on glass at night.
The golden rule of outdoor illumination is “illuminate the effect, never the source.” Instead of using bright, direct glare that washes out architecture, position warm luminaires (2700K to 3000K) out of direct sightlines to highlight textures, create depth, and ensure soft, glare-free walkway navigation.
When an outdoor lighting system is poorly planned, the first thing you notice pulling into the driveway is a collection of blinding hot spots—exposed bulbs stinging your eyes, harsh floodlights flattening out dimensional stonework, and a rigid row of glowing stakes marching down the sidewalk. Conversely, when a system follows professional design rules of thumb, the physical hardware disappears completely after sundown. Your eye is drawn effortlessly from the warm texture of a stone entryway to the sculptural canopy of an ornamental maple, guided through the dark by gentle contrast rather than brute-force wattage.
Mastering exterior illumination requires understanding how human night vision operates and applying proven architectural formulas for color temperature, spacing, beam angles, and layering.
1. The Core Philosophy: Concealing the Source to Control Glare
The human eye adapts slowly to darkness. When you walk out onto a softly lit patio and accidentally look directly into an unshielded LED diode, your pupils immediately constrict to protect your retinas. The moment your pupils constrict, everything else in the yard—the steps in front of you, the surrounding garden beds, and the perimeter lawn—instantly plunges into pitch blackness. In lighting design, this is known as disability glare.
To uphold the rule of illuminating the effect rather than the source, professional installers apply three physical techniques on every fixture:
- Optical Shielding and Snoots: Directional uplights should always be fitted with angled glare guards, extended shrouds, or internal hex-cell louvers. If a path light is used, its top hat should extend low enough to block any view of the stem diode from a standing adult’s eye level—even when walking up a sloped driveway.
- Natural Botanical Screening: Whenever possible, uplights are tucked behind low boxwoods, ornamental grasses, or hardscape boulders. The plant acts as a natural baffle from the street view while the beam shoots upward onto the home’s facade.
- Grazing vs. Flat Washing: Instead of placing a floodlight 15 feet out in the lawn and aiming it straight at the front of the house (which flattens the architecture and shines straight through the bedroom windows), designers place fixtures 6 to 12 inches away from the foundation wall and aim them nearly vertically. This architectural grazing forces the light to skim across the mortar joints of brick or the split-face clefts of stone, creating micro-shadows that bring dramatic texture to life.
2. The Color Temperature Rule: Why 2700K to 3000K Reigns Supreme
Color temperature is measured on the Kelvin (K) scale, which describes the visual warmth or coolness of a white light source. One of the fastest ways to ruin a high-end landscape is mixing conflicting Kelvin ratings or selecting overly cool bulbs.
- 2700K (Warm Incandescent White): The industry standard for residential landscapes and traditional architecture. Measured at 2700K, LEDs mimic the rich, amber-gold glow of classic halogen lamps and firelight. It pulls warm undertones out of red brick, cedar siding, flagstone, and autumn foliage, creating an inviting, resort-like atmosphere.
- 3000K (Soft Halogen White): Slightly crisper than 2700K without crossing into blue territory. Designers typically reserve 3000K for contemporary stucco homes, gray slate stonework, blue spruce trees, or commercial plazas where a cleaner, modern aesthetic is desired.
- 4000K to 5000K+ (Cool White / Daylight): Strictly avoided in residential landscape design. Not only does blue-rich light make green grass and tree leaves look dead, sickly, and artificial, but high-Kelvin light also disrupts nocturnal wildlife ecosystems and suppresses human melatonin production when shining near bedrooms.
Alongside Kelvin temperature, professional rules of thumb dictate using LEDs with a Color Rendering Index (CRI) of 85 to 95+. While Kelvin tells you the warmth of the light beam itself, CRI measures how accurately that light reveals the true pigments of the objects it hits. High-CRI lamps ensure a Japanese Maple looks deep crimson at midnight rather than muddy brown.
3. Spacing and Placement Formulas for Every Zone
Homeowners and generalist contractors often over-light walkways while under-lighting vertical focal points. Following established geometric spacing rules ensures balanced coverage across the property.
Walkways and Paths: The 10-to-15-Foot Stagger Rule
Never line path lights directly across from one another in parallel rows, and never space them closer than 8 feet apart unless navigating tight curves. Doing so creates the dreaded “airport runway effect,” drawing all visual attention to a strip of concrete instead of the surrounding landscape.
Instead, space path lights 10 to 15 feet apart in a staggered, zig-zag pattern alternating from the left side of the path to the right. It is completely unnecessary—and visually fatiguing—to cover every square inch of a walkway in bright light. Allow small, soft pockets of darkness to exist between the pools of illumination; your eyes only need visual breadcrumbs to read the edges and grade changes of the path ahead.
Steps and Elevation Changes: Tread-Level Illumination
Whenever a walkway transitions to steps, overhead path lights are no longer sufficient because they cast shadows over the risers. The rule of thumb for stairs is to place dedicated under-cap hardscape lights or recessed riser lights on every step—or alternating steps on wide staircases—casting between 35 and 75 lumens directly onto the tread nose where the foot lands.
Trees and Specimen Foliage: The 2-Fixture Triangulation Rule
Lighting a mature deciduous tree with a single spotlight from the front makes the canopy look like a flat, two-dimensional cardboard cutout. For focal specimen trees with trunks wider than 10 inches or canopies wider than 12 feet, the rule of thumb is to use at least two to three fixtures placed at 90- to 120-degree angles around the trunk.
By cross-lighting the interior branching structure and the outer leaf canopy from multiple angles, the tree gains three-dimensional volume and serves as a glowing sculptural anchor visible from both the street and the house.
4. The Lumen and Beam Angle Matrix
In low-voltage LED design, wattage is only a measure of energy consumption; lumens measure actual brightness, and beam spread (measured in degrees) dictates how wide or concentrated that brightness appears. A narrow 15-degree beam at 200 lumens will punch three stories up a chimney peak, whereas a 60-degree beam at that same 200 lumens will diffuse into a soft, gentle wash only 8 feet high.
| Target Application | Recommended Lumen Output | Ideal Beam Spread | Placement Rule of Thumb |
| Walkways & Garden Beds | 50 – 100 Lumens | 360° or 180° Downward | Stagger every 10–15 ft; keep fixture head 14–18 inches above mulch grade. |
| Hardscape Seat Walls & Steps | 35 – 85 Lumens | 90° – 120° Wide Diffused | Mount hidden beneath stone coping overhang; space every 4–6 ft on walls. |
| Architectural Columns & Pillars | 100 – 200 Lumens | 10° – 15° Narrow Spot | Place 6–10 inches in front of column base; aim straight up the vertical center. |
| Single-Story Stone / Brick Walls | 150 – 250 Lumens | 36° – 60° Medium/Wide Flood | Set 12–18 inches from foundation to graze texture; avoid window glass. |
| Two-Story Gables & Peaks | 300 – 500 Lumens | 15° – 25° Spot | Mount either at ground level using high-lumen spots or tuck a mini-uplight in the lower roof gutter line. |
| Ornamental Trees (Under 15 ft) | 150 – 250 Lumens | 36° Medium Flood | Position 2–4 feet out from trunk to capture lower canopy spread. |
| Mature Canopy Trees (30+ ft) | 450 – 800+ Lumens | 25° – 36° Spot/Flood | Combine 1–2 narrow spots hugging the trunk with wider floods aimed at outer foliage. |
5. Layering the Three Types of Landscape Lighting
Just like a high-end interior living room relies on recessed ceiling cans, table lamps, and picture lights working together, a cohesive exterior design requires balancing three distinct layers of light:
- Ambient Lighting (The Foundation): Soft, indirect illumination that establishes the general boundary and mood of an outdoor space. Examples include high-canopy moonlighting filtering down through oak branches onto a lawn, or wide-angle washes warming the perimeter privacy fence so the yard does not feel like a dark void.
- Task and Safety Lighting (The Function): Targeted, downward-directed light that allows people to move and work safely after dark. This includes path lights, stair tread lights, driveway marker lights, and focused task downlights mounted inside a pergola directly above an outdoor grill and prep counter.
- Accent and Focal Lighting (The Drama): High-contrast directional beams that draw the eye to the property’s best architectural and natural features—such as grazing a stacked-stone waterfall, silhouetting a Japanese maple against a stucco wall, or uplighting an entry archway.
The 3:1 Contrast Rule: For an accent light to truly pop as a focal point, its target should be illuminated to roughly three times the brightness of the surrounding ambient environment. If you flood the entire yard with equal brightness, nothing stands out, and the visual mystery of the night landscape is lost.
6. Designing From the Inside Out: Eliminating the “Black Mirror”
One of the most overlooked rules of thumb in residential lighting is remembering how you actually experience your property 90% of the year. You only see your front yard for about thirty seconds when you pull into the driveway at night—but you look out your kitchen, dining room, and living room windows for hours every evening.
When it is dark outside and your interior lights are turned on, uncovered windows turn into black mirrors, reflecting the interior of your room back at you and making the house feel boxed in. By placing warm uplights on distant perimeter trees, arbors, and garden walls along the exact sightlines of your main interior windows, your eyes can see past the window glass. This simple optical rule visually doubles the perceived square footage of your indoor rooms by pulling the illuminated backyard directly into your nightly living experience.
7. Dark-Sky Compliance and Neighbor Etiquette
Responsible illumination respects property lines and the night sky. Every fixture aimed upward should have a physical target—a soffit overhang, a stone wall, or a dense tree canopy—to catch and absorb the light beam. Firing wide-open floodlights straight into empty sky creates light trespass that annoys neighbors and washes out the stars. Whenever possible, combine shielded uplighting with elevated downlighting, mounting fixtures high in architectural eaves or tree trunks and aiming them below the horizontal plane to keep every lumen focused strictly on your own turf.
Have more Questions?